In today’s security-conscious world, protecting your property with a reliable surveillance system has become essential rather than optional. The rise in security concerns has made Closed-Circuit Television (CCTV) systems with Network Video Recorders (NVRs) a cornerstone of modern security solutions for both homes and businesses. These systems not only deter potential intruders but also provide invaluable evidence in case of security breaches.
Are you concerned about the safety of your property? Do you find yourself worrying about potential security threats when you’re away? A professionally installed CCTV system with NVR could be the solution you need. With high-definition cameras capturing crystal-clear footage and advanced NVRs storing weeks of recordings, you can gain peace of mind knowing your property is under constant surveillance.
This comprehensive guide will walk you through the entire process of installing a cutting-edge CCTV system with an NVR, from planning your camera layout to setting up remote viewing. Whether you’re a DIY enthusiast or considering professional installation, this step-by-step tutorial will provide you with the technical knowledge to make informed decisions about your security system.
Understanding Your CCTV and NVR System Components
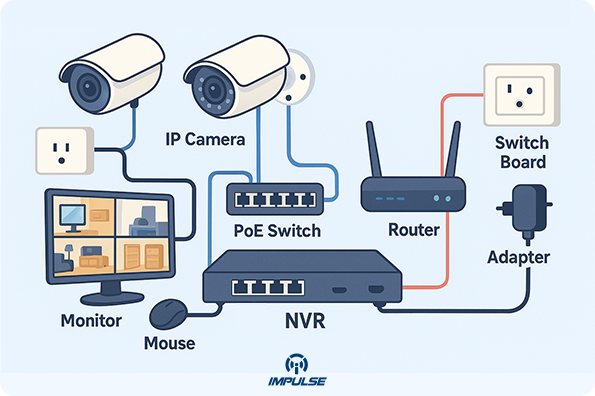
Before diving into the installation process, it’s crucial to understand the key components of a modern CCTV system:
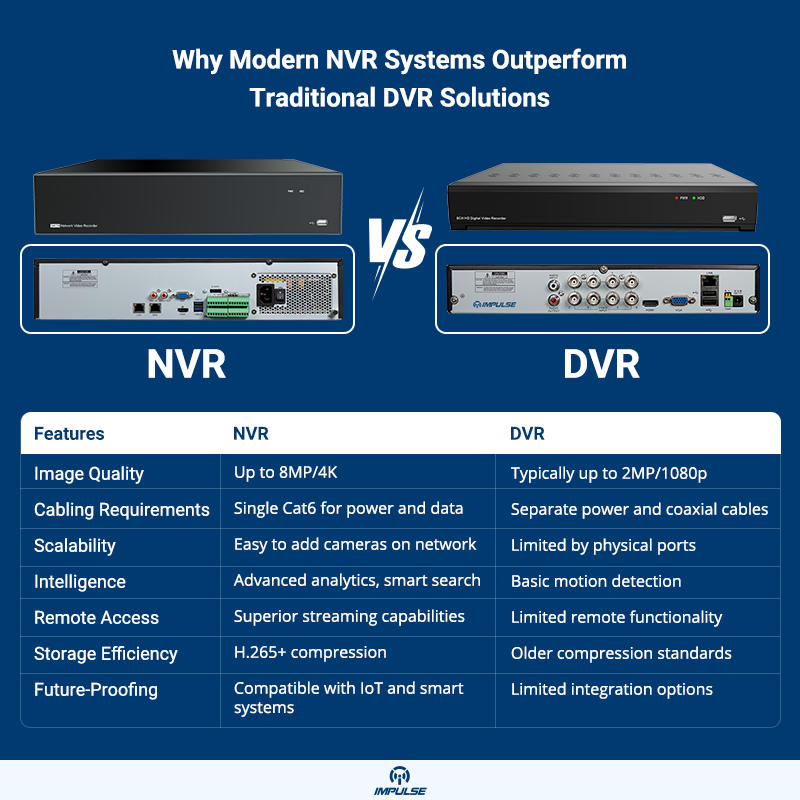
Network Video Recorder (NVR)
The NVR is the heart of your surveillance system. Unlike outdated DVR systems, modern NVRs like the 16-Channel Network Video Recorder and Channel Network Video Recorder from Impulse CCTV offer superior performance with features such as:
- Support for multiple IP cameras (16 to 32 channels)
- 4K resolution recording and playback
- H.265 and H.264 compression for efficient storage
- High recording bandwidth (up to 320Mbps)
- Multiple SATA HDD bays (2 to 8 depending on model)
- HDMI output for direct monitoring
IP Cameras
Modern security systems use IP (Internet Protocol) cameras that connect to your network. Impulse CCTV offers several high-performance options:
- 5MP Varifocal Network Bullet Camera
- 1/2.7″ CMOS sensor for excellent image quality
- 2.7mm to 13.5mm varifocal lens for adjustable viewing angles
- 50-meter IR range for night vision
- Audio/Alarm in/out for enhanced security
- Edge analytics with motion detection
- 8MP Bullet Camera
- High-resolution surveillance for critical areas
- Advanced features for superior performance
- 8MP Dome Camera
- Discreet installation option with premium features
- Perfect for indoor applications
- 5MP Varifocal Network Dome Camera
- 2.7mm to 13.5mm varifocal lens
- Up to 50-meter IR range
- Edge analytics with deep learning capabilities
- Weather-resistant for outdoor installation
Additional Components
- PoE Switch – Powers and connects IP cameras through a single Ethernet cable
- Cat6 Cables – High-speed network cables for camera connectivity
- Hard Drives – For video storage (size depends on recording needs)
- Junction Boxes – For clean cable management
- Mounting Hardware – For secure camera installation
Planning Your CCTV System
Step 1: Assess Your Security Needs
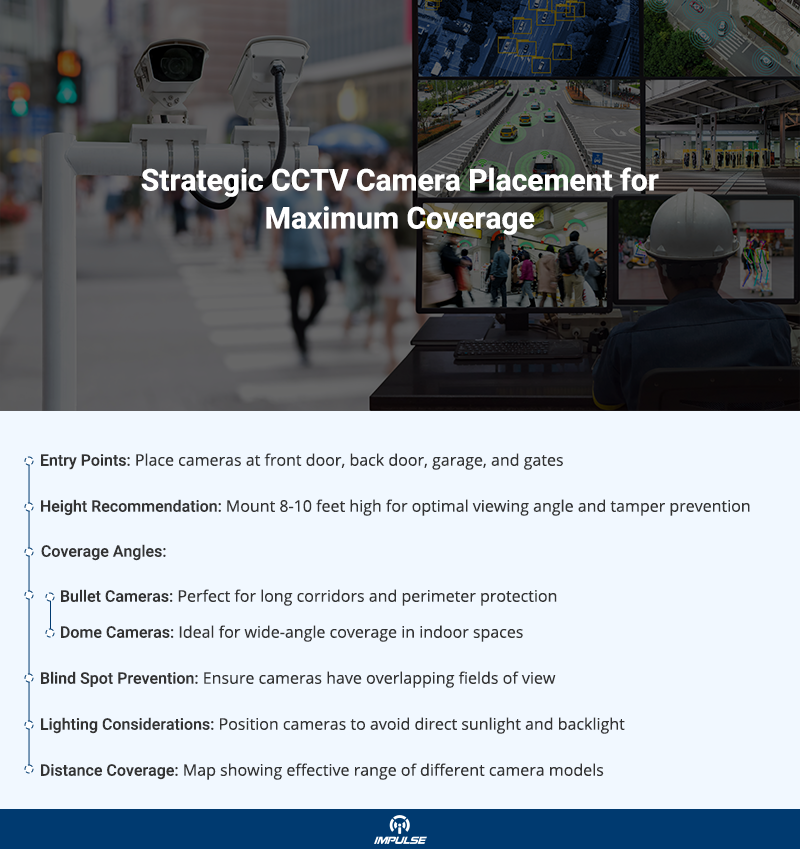
Before purchasing equipment, analyze your property to identify your security requirements. Begin by examining vulnerable entry points like doors, windows, and gates. Next, take note of areas containing valuable equipment or inventory that need extra monitoring. Don’t forget to identify blind spots – areas that are hidden from view but require surveillance. Finally, determine which areas need indoor versus outdoor cameras, as different environments require different types of equipment.
Step 2: Create a Camera Layout Map
Draw a floor plan of your property and mark all the essential elements for your CCTV installation. This should include optimal camera positions with their fields of view, a secure and centralized location for your NVR that remains accessible for maintenance, planned cable routes from each camera to the NVR, and available power source locations throughout the property.
Step 3: Calculate Storage Requirements
Storage needs for your CCTV system depend on multiple factors that work together. Consider the number of cameras you’ll be installing, as each additional camera requires more storage space. The recording resolution affects storage significantly – higher resolution means clearer footage but requires more space. Frame rate also impacts storage needs, with higher fps requiring more capacity. Your choice between motion detection or continuous recording will affect storage requirements, as will your desired retention period for keeping footage. For reference, a typical 8-camera system recording at 5MP with motion detection requires approximately 4-8TB of storage for 30 days of footage.
Step-by-Step CCTV Installation Guide
Step 1: Prepare Your Equipment and Tools
Equipment Checklist:
- Network Video Recorder (NVR) – Choose between 16-Channel Network Video Recorder or 32-Channel Network Video Recorder models depending on your camera count needs
- IP Cameras – Select appropriate models based on your specific surveillance requirements and mounting locations
- Power over Ethernet (PoE) Switch – Essential for powering and connecting your IP cameras through a single cable
- Hard Drives – Enterprise-grade storage devices specifically designed for 24/7 surveillance recording
- Cat6 Ethernet Cables – High-quality network cables for reliable data transmission between cameras and NVR
- Mounting Hardware – Including brackets, screws, and anchors suitable for your installation surface
Tools Required:
- Power Drill with Multiple Drill Bit Sizes – For creating mounting holes in various surfaces
- Cable Fishing Tools and Wire Pullers – For running cables through walls and ceilings professionally
- Professional Wire Strippers/Crimpers – For precise cable termination and connection
- Network Cable Tester – To verify proper connectivity and signal strength
- Sturdy Extension Ladder – For safely accessing high mounting locations
- Professional Measuring Tape – For accurate camera placement and cable length estimation
- Bubble Level – To ensure cameras are mounted perfectly straight
- Complete Screwdriver Set – Including both Phillips and flathead varieties for various mounting needs
Step 2: Install the NVR
- Choose the optimal location – Select a secure, cool, and dry location with access to power and network connectivity. Consider a lockable cabinet for added security.
- Install hard drives:
- Power off the NVR
- Remove the cover (usually secured with screws at the back)
- Insert hard drives into the bays
- Connect SATA and power cables
- Secure the drives with screws
- Replace the cover
- Connect to network:
- Connect the NVR to your PoE switch
- Connect the NVR to your router for remote access
Step 3: Mount the Cameras
- Prepare mounting locations:
- Carefully mark drill hole positions using the mounting bracket as a template, ensuring proper alignment
- Create pilot holes with appropriate drill bit size to prevent wall damage and ensure secure mounting
- When necessary, drill a larger access hole for cable routing, making sure to avoid electrical wiring and pipes
- Run cables:
- Carefully route Cat6 cables from each camera location back to the NVR, avoiding sharp bends and potential damage points
- Leave approximately 1-2 feet of extra cable at the camera end to allow for adjustments and maintenance
- Install weather-resistant conduit for all outdoor cable runs to ensure long-term protection from sun, rain, and temperature changes
- Create a detailed labeling system for each cable to simplify future maintenance and troubleshooting
- Mount the cameras:
- For Bullet Camera models:
- Securely attach the mounting bracket to wall or ceiling using appropriate anchors and screws
- Carefully connect the Ethernet cable to camera, ensuring proper seating and weather seal
- Mount camera to bracket following manufacturer specifications
- Fine-tune camera angle for optimal coverage and securely tighten all locking screws
- For Dome camera models :
- Carefully remove dome cover without damaging the protective coating
- Mount base securely to ceiling or wall using provided mounting hardware
- Connect Ethernet cable ensuring proper connection and strain relief
- Position camera module for desired viewing angle and coverage area
- Reattach dome cover ensuring proper alignment and weather seal
- For Bullet Camera models:
- Adjust varifocal lenses:
- Connect to camera’s web interface through network connection and verify access
- Adjust focal length from 2.7mm for wide-angle monitoring of large areas to 13.5mm for detailed views of specific zones
- Fine-tune focus settings while monitoring live view to achieve maximum image clarity and detail
Step 4: Configure the NVR System
- Initial setup:
- Create a secure admin password that combines uppercase, lowercase, numbers and special characters for maximum security
- Configure accurate system date and time settings to ensure proper timestamp recording of all footage
- Set up comprehensive network settings including IP address, subnet mask, and gateway to enable proper network connectivity
- Add cameras to NVR:
- Take advantage of Impulse CCTV’s built-in auto-discovery feature to simplify camera setup
- Navigate to “Add Cameras” section in the NVR interface to begin the connection process
- Allow the system to perform a thorough network scan to automatically detect all available cameras
- Carefully select each camera and input the necessary authentication credentials for secure access
- Configure recording settings:
- Choose between continuous recording for complete coverage, motion detection for efficient storage, or scheduled recording based on your needs
- Configure optimal resolution settings – 5MP for standard surveillance areas and 8MP for locations requiring enhanced detail
- Set appropriate frame rate between 15-30 fps depending on movement levels in monitored areas
- Adjust pre-recording and post-recording durations to ensure complete capture of motion-triggered events
- Set up motion detection zones:
- Navigate to individual camera settings to configure motion detection parameters
- Carefully map out and define specific areas where motion detection should be active while excluding high-movement zones
- Fine-tune motion sensitivity settings to achieve optimal balance between detection and false alarm prevention
- Set up comprehensive alarm responses including recording triggers, email notifications, and mobile alerts
Step 5: Advanced Configuration
- Remote viewing setup:
- Enable port forwarding on your router
- Set up DDNS for remote access without static IP
- Install mobile app (typically provided by Impulse CCTV)
- Add your NVR to the mobile app using device ID or QR code
- Alarm configuration:
- Connect external sensors if applicable
- Set up email notifications
- Configure push notifications to mobile devices
- Fine-tune camera settings:
- Adjust image parameters (brightness, contrast, saturation)
- Configure WDR (Wide Dynamic Range) for challenging lighting
- Set IR cut filter switching for day/night operation
- Storage management:
- Configure overwrite settings
- Set up disk groups if using multiple HDDs
- Enable drive health monitoring
Maintenance and Troubleshooting Tips
Regular system maintenance is crucial for optimal CCTV performance. This includes routine cleaning of camera lenses, checking cable connections, updating firmware, testing motion detection functionality, and monitoring storage capacity. Proper maintenance helps prevent common issues and ensures reliable surveillance coverage.
When troubleshooting, start by checking the basics: verify all connections are secure, ensure power supplies are functioning, and confirm network settings are correct. For video quality issues, inspect camera lenses for cleanliness and adjust settings as needed. If storage problems arise, consider optimizing recording settings or expanding storage capacity.
Conclusion
Installing a CCTV system with an NVR provides comprehensive security coverage for your property. By following this step-by-step guide, you’ve learned how to plan, install, and configure a professional-grade surveillance system using high-quality Impulse CCTV components like the Professional Series Network Video Recorders and our range of dome and bullet security cameras.
Remember that a properly installed security system serves multiple purposes:
- Deterring potential intruders
- Capturing evidence when incidents occur
- Providing peace of mind
- Potentially reducing insurance premiums
For optimal results, consider your specific security needs and environment when selecting equipment. The versatile range of Impulse CCTV products, from 5MP to 8MP cameras with advanced features like varifocal lenses, deep learning analytics, and extensive IR range, ensures you can build a customized system tailored to your requirements.